
TurboTransAm.com
You are using an out of date browser. It may not display this or other websites correctly.
You should upgrade or use an alternative browser.
You should upgrade or use an alternative browser.
Bad fuel pump ?
- Thread starter robert lee
- Start date

robert lee
Gold Member
Yeah for some reason he keep saying get the cutting torch...:eeks:Good going Robert! Pretty creepy looking advisor.


robert lee
Gold Member
Marcel, that was a hr or two getting it out, Mike that was before the pump(trying to burn up gas of course), Kymmee about as much fun as a root canel, that little burn-out was nothing with street tire's but that's with new DR'S , Rich it's still out on the ground so i will eyeball it, JB weld maybe? I put the new pump in yesterday but i have a feeling it's going to be a bitch going back in solo...
robert lee
Gold Member
Sound's good to me... i've got 55gal of M1 Meth to use up...Robert, November 9th and 10th Hartline puts a Buick race together in Reynolds ga at silver dollar raceway. Get your shit together and I'll meet you there. It's 90 miles from Newnan.

jarredsoon
Gold Member
Rob I showed Maeghan your pics and she feels your pain. She's seen me go through that too many times. It really helps to have someone guide the filler neck into the hole while you push the gas tank up and strap it in. I was lucky to have my cousin around a couple times.
Rich is correct the tank can leak from that area, I had mine welded while it was out, but good luck finding someone to do it. Everyone was scared.
Oh yeah Maeghan is jealous you get to work outside!!!, I'm jealous you get to go to Reynolds and meet up with Jason...
Rich is correct the tank can leak from that area, I had mine welded while it was out, but good luck finding someone to do it. Everyone was scared.
Oh yeah Maeghan is jealous you get to work outside!!!, I'm jealous you get to go to Reynolds and meet up with Jason...
Sound's good to me... i've got 55gal of M1 Meth to use up...
Make sure the car is ready to go and I'll help you get it going.
Every vacuum line is new and ziptied.
No boost leaks at the couplers.
Set the base fp before you leave.
Fresh oil and filter.
Full tank of gas.
Most importantly-POWERLOGGER AND SCANMASTER MUST WORK PROPERLY.
Racing without data is like pissing I'm the wind and on an electric fence at the same time.
Send me a link to all your mods on this car.
robert lee
Gold Member
yep and i am jealous you ran a 10.7 ... so we are even .. now it was 75deg today and low 80's all next week so we are even... BTW it's not unusual for it to be 60-70deg- on christmas day here, bring Maeghan down south and ya'll can both have funRob I showed Maeghan your pics and she feels your pain. She's seen me go through that too many times. It really helps to have someone guide the filler neck into the hole while you push the gas tank up and strap it in. I was lucky to have my cousin around a couple times.
Rich is correct the tank can leak from that area, I had mine welded while it was out, but good luck finding someone to do it. Everyone was scared.
Oh yeah Maeghan is jealous you get to work outside!!!, I'm jealous you get to go to Reynolds and meet up with Jason...


RatFink
TORQUE
And we understand why people install the access door to install another fuel pump!
Yeah, I will strongly think about doing that when my stock intake pump fails. That was the reason I did an external piggy back. back in the day. Was easier than dropping the tank.
Yeah, I will strongly think about doing that when my stock intake pump fails. That was the reason I did an external piggy back. back in the day. Was easier than dropping the tank.
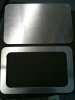
Here is the back of my car. Stainless steel and then powdercoated white.
Attachments


RatFink
TORQUE
Here is the back of my car. Stainless steel and then powdercoated white.
Nice!
robert lee
Gold Member
Success !!! everything back together and running, FP doing what it should. the hardest thing about it all was that damn exhaust, muffler fell and hit me it the head twice...
Success !!! everything back together and running, FP doing what it should. the hardest thing about it all was that damn exhaust, muffler fell and hit me it the head twice...
Maybe it knocked some sense into you. :clap:
Send me your complete mod list and also what chip you are running.
robert lee
Gold Member
Ha Ha, at least it hit where no damage was doneMaybe it knocked some sense into you. :clap:
Send me your complete mod list and also what chip you are running.
 , i'll get a list together and pm it...
Scott89TTA
Well-Known Member
Here is the back of my car. Stainless steel and then powdercoated white.
Jason, I see you got tired of waiting on me...nice job :thumbup:
Attachments


jarredsoon
Gold Member
I have dropped the tank at least five times.... Don't ask why. Anyway I think it would be faster for me now to just drop the tank vs cut "a clean and tidy" access hole....
Scott89TTA
Well-Known Member
Can this mod be done with the tank in place?
And...can anyone who has done this, post some measurements from a common point of reference? ...and of course size of the opening.
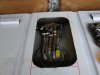
I did mine with the tank in place...never dropped the tank. After looking at both options I felt I could do a clean job in less time and benefit me later if I ever needed to change the pump again :boxed: Guess who ended up with one of the "bad batch" Walbro pumps a few years ago...yup you guessed it, ended up changing my pump for the second time at a Turbo Buick BPG event at Cecil County Dragway in the pits in about 30 minutes.
The safest way to cut it out in my opinion is a nematic knibler...it's doesn't make any sparks and only needs about 1/2" clearance. You can get one for about $20 at Harbor Freight. Draw the pattern with a Sharpie, carefully drill a starting hole for the nibbler and cut away. Only down side to the nibbler is the 2 million half moon shaped pieces of sheet metal the nibbler will shoot all over the place.
The cutout is centered between the 2 ribs in the floor pan leaving about 1-1.25" on each side. I did radius corners to help maintain rigidity...used a spray paint can for the radius. I used 1/8" neoprene rubber sheet for a gasket...I happened to have some adhesive backed but that isn't necessary.
For the hardware I used S/S PEM nuts (press-in, installation tool required for best results) and S/S 10-32 x 3/8" pan-head screws and .092" S/S sheet metal for the access panel (floor pan is .032").
My original post from 10/2008 http://www.turbobuick.com/forums/threads/how-to-change-a-tta-fuel-pump-in-30-minutes-or-less.265540/
Attachments

Last edited:
